Preface:
If simply retexturing villagers can be called ‘intermediate’, this can be called an advanced level tutorial. You will require beyond surface level knowledge of model creation and/or editing!
I cannot 100% assure this will work – however I have had no issues with it thus far.
I am also not claiming this is the best way to do this, but again, this is what worked for me.
Also, as with any modification of any game: Proceed at your own risk. Generally the worst that happens with 3DS modding is your save gets corrupted, so remember to save checkpoints/backups if you’re modifying a save you care about. However, simple crashes are more common.
This tutorial runs on the assumption you already have CFW set up with Luma’s patching enabled. If you have no idea what this means please don’t try jumping into this yet.
I believe that Citra’s layered modding system functions similarly to Luma’s layeredFS, but I do not know the procedure or filepaths like I do for Luma.
We will be making a custom villager model replacement – however you can repurpose this method for unrigged things too, like player hairs, furniture, PWPs, etc.
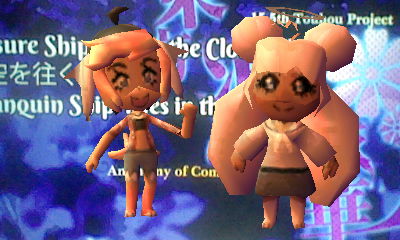
The end goal is to replace a villager with one of my OCs – for the CGFX method, I’m going to replace Pashmina with Chantal (left). For the CTR Studio method, I’m going to replace Mott with Deni (right).
You are allowed to republish or reformat this tutorial, however I’d ask that credit to my Tumblr (kk-dirge) be present. You don’t have to link here because this is my OC archive website lol


Let’s get started!
1. Prereqs (What you need)
- A windows computer, due to use of command prompts/program limitations
- 3DS running Luma CFW
- Decompiled ROMFs of ACNL/ACNL:WA
- A 3D model that fits the specifications (see below)
- Blender (Any version works, though 3.3+ is needed for the CTR studio method)
For the CGFX converter method…
- Milkshape 1.8.5 BETA (Older versions will not work) // Paid program with 30 day free trial, sorry.
- CGFX converter
- Ohana rebirth (Optional, for model viewing/reference)
For the CTR studio method…
- CTR studio (Download the latest release ZIP)
What’s the difference?
CGFX converter and Milkshape are deprecated programs and are pretty bare bones – if that’s a good thing or not is up to you. While they’re old, they’re stable and generally do not cause wild errors unless you do something wrong.
Also, models imported this way tend to have shading issues.
CTR studio is actively in-development (as of writing), and is constantly having fixes and new features added. It can work with modern programs with modern QOL improvements, but there is a much larger room for error.
Choose whichever method works for you!
2. Setting up your model
(This process is similar for both CGFX and CTR, so it’s merged into one section. However, it will refer exclusively to Chantal’s model as it was written originally for the CGFX tutorial.)
The 3DS is a piece of hardware with limits that cannot be ignored – if you do, you will get crashes and things will not work.
Using Ohana rebirth, I exported Pashmina’s model (villagers can be found in NPC->Normal->Model) as a .DAE to open it in Blender. Again, this is not necessary, but can be very useful for reference in terms of proportions.
CTR studio edit: Exporting the model as a .dae from CTR studio is required if you choose the CTR studio method.
For the replacements I’ve done so far, I’ve generally noticed the villager polycount is around 630. That’s pretty low! To stick on the safe side, I’d suggest keeping your model’s polycount as close to this as possible, or lower. This polycount includes all the materials/parts. Additionally, filesize matters – around 20kb higher than the original and things stop working.
Depending on the villager you’re replacing, your model will have 2 materials or 3 materials.
If the base villager you’re replacing has a ‘flappy’ mouth (i.e. horses, wolves, birds); you will have 2 materials.
If the base villager you’re replacing has a texture mouth (i.e. bears, cats, dogs); you will have 3 materials.
The texture size for these materials is very small and in the end will be compressed so detail will be hard to see, so keep that in mind!
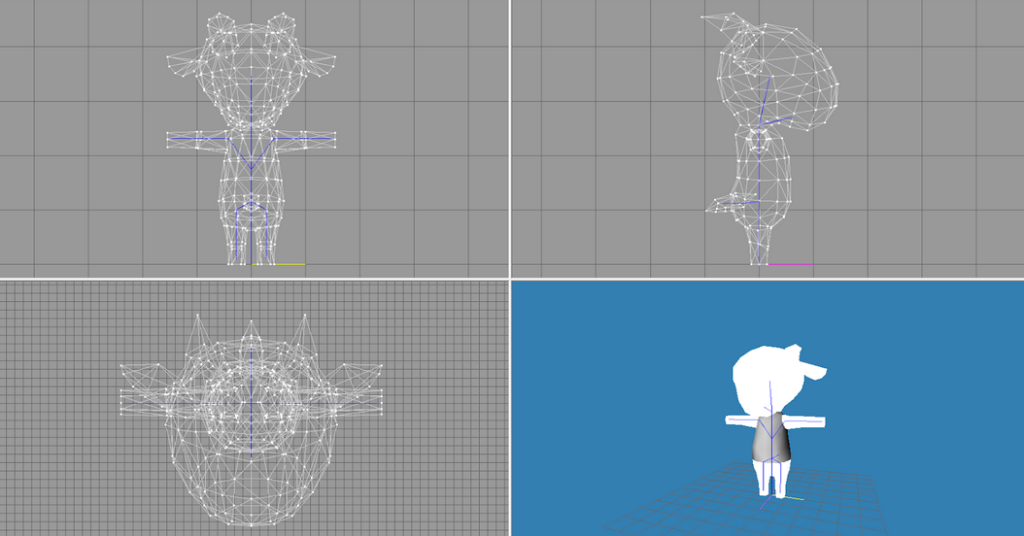
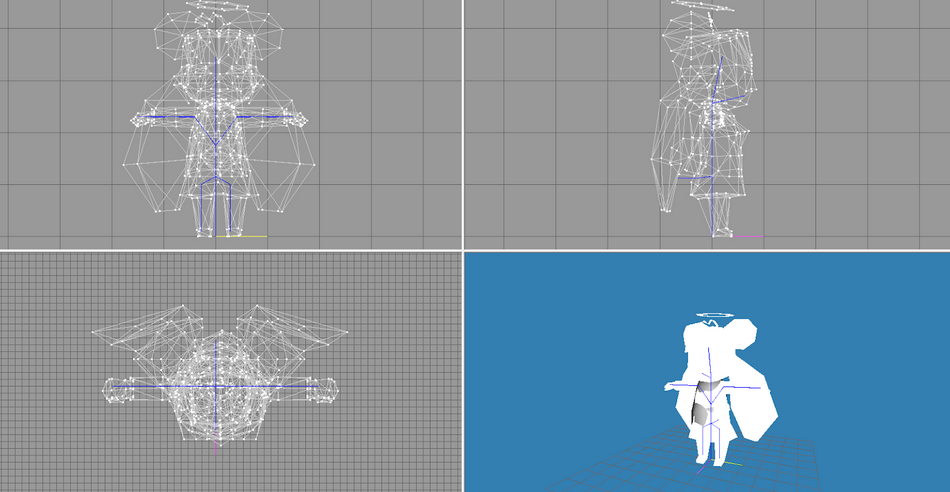
This is what Chantal’s model looks like, and it sits at 659 polygons – which is a bit higher than the goat model Pashmina uses (which was 628), but not too much higher.
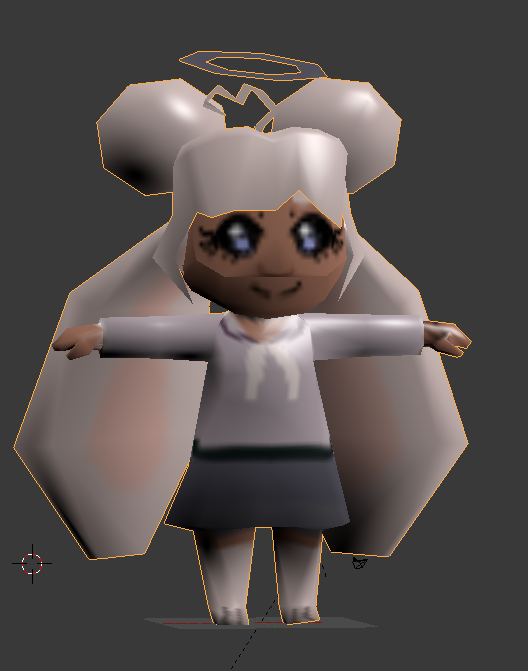
Since goats have a texture mouth, Chantal’s model is separated into three materials, and you can see a bit on the seam between her eyes and mouth plates.
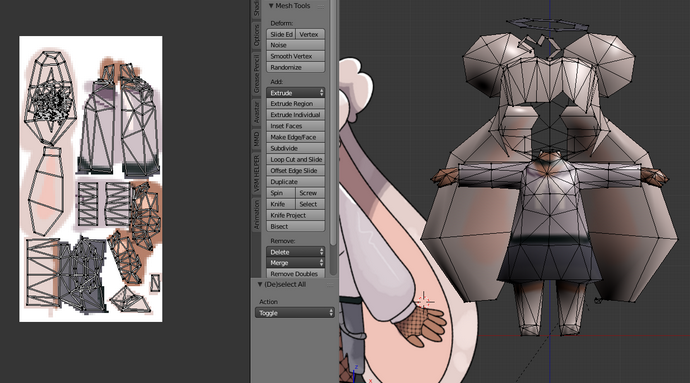
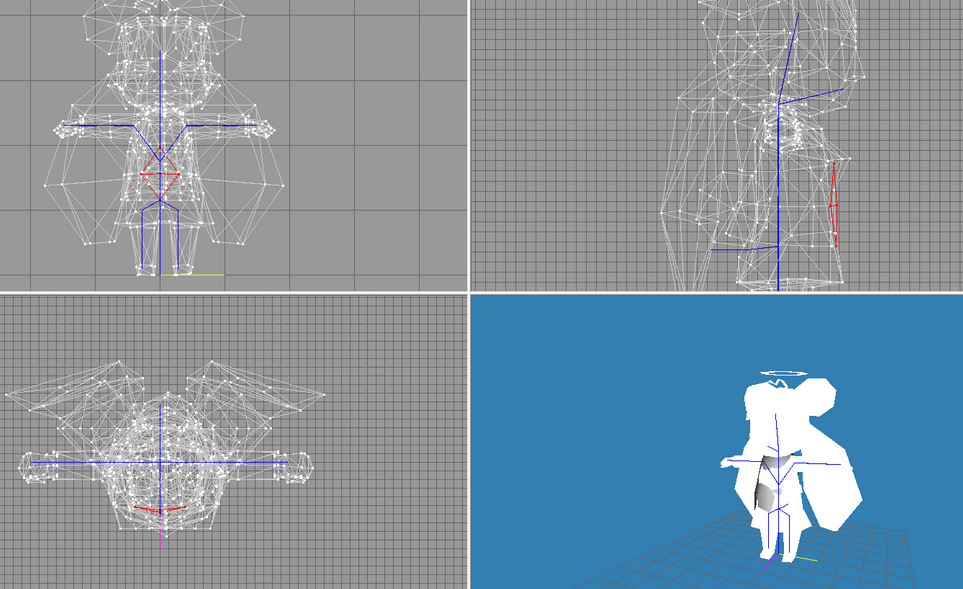
This is Chantal’s body material, which is mapped to a 64x128px texture. It is separate from the face, as the eyes and mouth both need to be separate to animate – however, if you have a flappy-jaw villager as your base, the mouth should be included in the body.
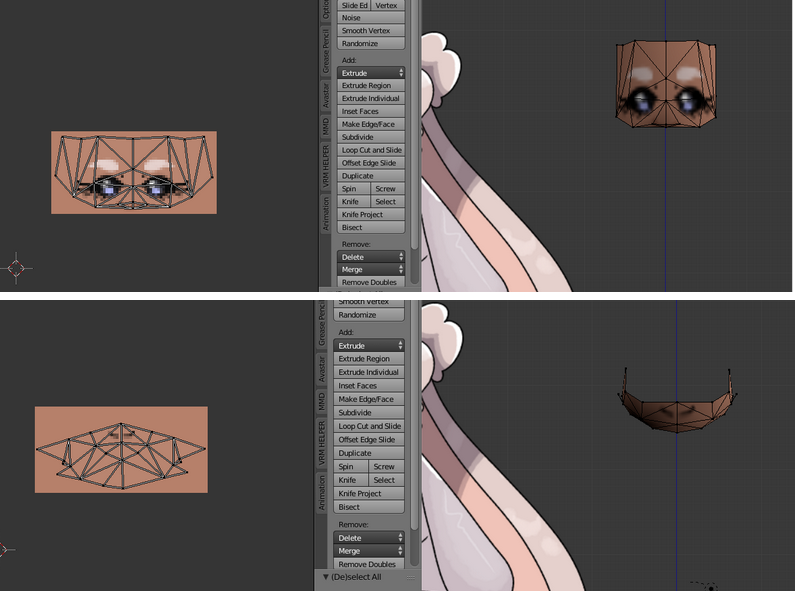
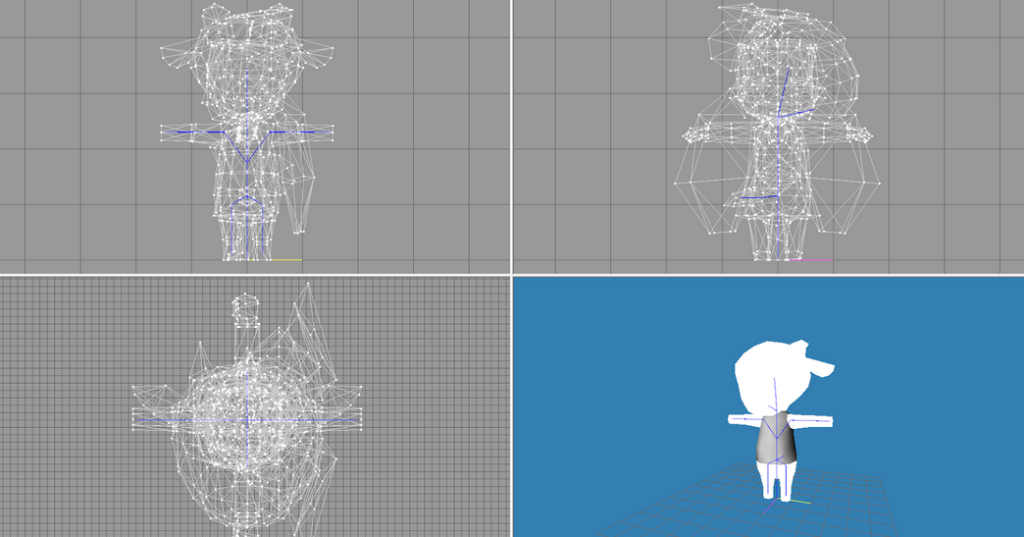
These are Chantal’s eyes and mouth, which are both 64x32px textures. Both must be their own object, with their own material.
Note how Chantal is not wearing a blank shirt – you do not have to make a group for this if you don’t want to, details on how to remove the shirt will come later. If you’d like your villager to have a shirt they can change, you simply need to separate it like how the body, eyes, and mouth are separate.
If using the CGFX converter method…
- Ensure that the body, mouth, eyes, and shirt if you’re including it have been separated by material…
- That the separated parts only have one material each that is used by the whole mesh…
- That any vertex groups, colors, etc have been cleaned…
- That you go to ‘User preferences’, search MS3D, and enable the MS3D import,export plugin…
- Apply the location, rotation, and scale of each mesh…
- Select each of the separated parts, and export them as .MS3D separately. You do not have to change the export settings, and try and name them something like ‘body’ ‘mouth’ ‘eyes’ etc.
If using the CTR studio method…
- Ensure that the body, mouth, eyes, and shirt if you’re including it have been separated by material…
- That the separated parts only have one material each that is used by the whole mesh…
- That any vertex groups from the original model (if a conversion), colors, etc have been cleaned…
- And that you save your file in a format that can be opened by Blender 3.3, if you’re not already in there.
The paths diverge below! Pick your poison!
CGFX converter method
3a. Exporting the base villager & textures
Time to use CGFX converter! You can find the download in the prereqs, download the .ZIP file and unzip it somewhere (preferably where you keep your modding tools?)
Find your base villager’s .bcres file in extractedromfs->NPC->Normal->Model – for context, Pashmina is goa08.bcres. You can find villager IDs on Nookipedia. Copy this into the folder you unzipped CGFX converter to.
We want to open a command prompt now! I know they’re scary but it’s not that hard, promise.
If you’re less tech savvy, or lazy like me, you’ll probably want to copy the file path to the folder where CGFX converter is located as text (right click top folder nav->copy as text).
Open the command prompt however you wish – easiest for me on Windows 10 is by typing ‘cmd’ in search.
Navigate to the folder you placed CGFX converted in;
cd [either manually type the file path or ctrl+v the path you copied earlier]Now, we want to convert the .bcres to something we can open;
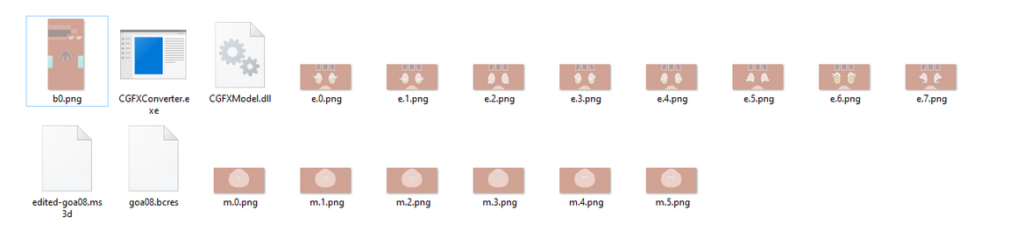
CGFXConverter export goa08.bcres edited-goa08.ms3dIn your case, replace goa08 with whatever your file is. The second filename doesn’t have to have the edited- prefix, but it MUST be distinct from the original somehow.
Your folder should look something like this now!
If you did your textures earlier by exporting them through Ohana, you can skip the next few steps.
If you didn’t make sure you have textures for the body, all the eye states, and all the mouth states if your base has them.
The states usage is as follows;
Body is just b0.png
Eyes:
- Default (e.0.png)
- Half blink (e.1.png)
- Closed (e.2.png)
- Angry (e.3.png)
- Sad (e.4.png)
- Happy Closed (e.5.png)
- Surprised (e.6.png)
- >_< expression (e.7.png)
Mouth:
- Default (m.0.png)
- Halfway open (m.1.png)
- Fully open (m.2.png)
- Frown (m.3.png)
- Halfway open frown (m.4.png)
- Fully open frown (m.5.png)
You’re not required to match these prompts (i.e. if you want a villager who looks happy all the time?), but those are the situations the plates will generally be used in in-game.
Once you’re done, save all the textures with their corresponding names, and copy them into the CGFX converter folder, replacing the old ones.
4a. Milkshape (beloathed)
I’m forcing myself to not be profane here. I do not like milkshape. BUT it’s the only program that makes this method work, so we gotta suffer through it anyways.
Open milkshape and open the .ms3d that was exported earlier. By default, your viewport interface should look something like this;
You can find the controls to the right side by default.
Let’s merge in our new model!
Go to file->merge and open all the parts you exported from Blender.
As you can see, it shows up in the wireframe tabs, but not in the 3d preview tab. This is because the Chantal’s model’s material is blank.
Also take note that she appears to be rotated the wrong direction – in the upper left window, you can see she’s facing to the side.
Nothing we can’t fix!
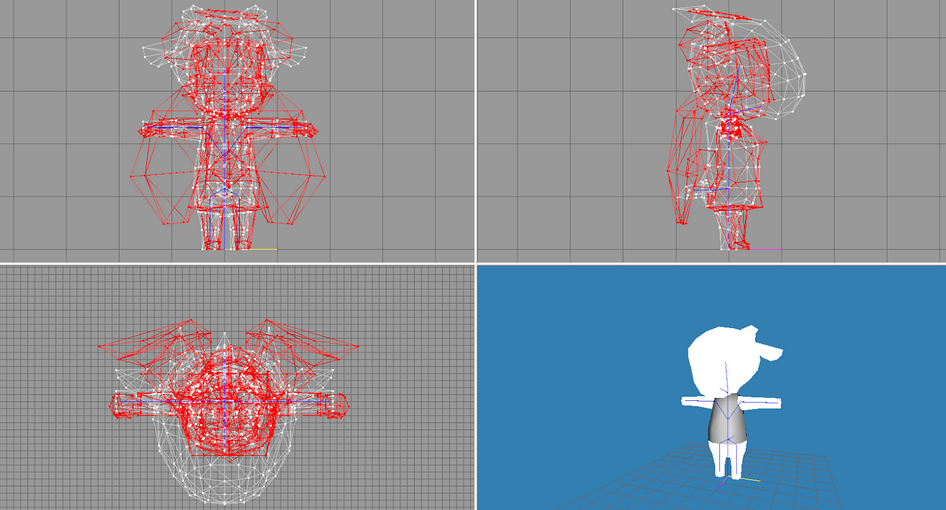
Go to the groups tab, and you should see the base model’s groups, as well as your model’s imported groups.
Double-click each of your model’s groups to select them.
Go back to the tools tab, and select rotate. There, you can either use your mouse in one of the wireframe windows to rotate it, or enter an exact coordinate to be more precise.
Since Chantal is facing to the right, I can just make her rotate 90 degrees on the y axis.
There we go!
Next, we want to remove the base model’s groups and replace them with our own.
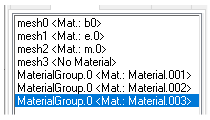
Press ctrl+shift+a to deselect everything, then go back to the groups tab – make sure to remember what groups are which! But generally…
Mat: b0 is the body
Mat: e.0 is the eyes
Mat: m.0 is the mouth (if your base has it)
No materials is the shirt
We’ll start with the body. Delete it! Once it’s deleted, rename your mesh’s body group to whatever the original body group was named, and then use the up/down buttons to put it into the same location of the hierarchy that the old group was in.
Next, double click the group to select it, then go to the ‘Materials’ tab. Click the old group’s material (in the body’s case, b0) and click ‘assign’.
You’ll see your model should show up in the viewport now!
Repeat this for the rest of the model groups. Make sure to delete the original materials that were imported with your model too!
If done correctly, you should have replaced the model!
…But what about the shirt?
If your model doesn’t use a shirt, you can’t just delete it or the importer will probably throw an error. It’s wishy washy workaround time!
Select 1-2 triangles from the shirt – then double click to select the body, eyes, and mouth (if there) groups.
Then, go to edit->select invert or simply press ctrl+i. Now only the shirt (minus 1-2 polygons) should be selected.
Press the delete key to delete it! Double click to select the shirt group again, this time only being the 1-2 polygons. Use the scale and move tools to make it small and move it inside the model so it won’t be seen. Profit!
Of course, if your model uses the shirt, you can just skip all that.
Next…
🔥rigging🔥
Rigging in milkshape is such a pain in the ass, but the auto-weight function will cause extreme distortion/parts not showing up in-game. So we gotta suffer for this one.
Make sure your select tool is your active tool, then move to the joints tab.

This is all confusing and it sucks but I’ll do my best to explain.
The top half is completely irrelevant, unless you want to double check what is and isn’t weighted to what.
What we care about is what’s below the ‘vertex weights’ header.
Check ‘draw vertex weights, and move the first slider (the one that goes from green to red) to the red side – or just enter 100.
Where it says none, click the dropdown and select ‘root’. Make sure the weight amount didn’t reset, and change it back to 100/red if needed.
Then, select your entire model and click ‘assign’ at the bottom.
Select ‘base’ in the same dropdown you selected ‘root’ in, and repeat.
Now this is where it may or may not be tricky, depending on how complex your model’s geometry is. Select ‘chest’ on the dropdown, and press ctrl+shift+a to deselect everything. Then, using the tools you have, select the chest of the model – it’s ok if things that are not the chest are included, as long as their bones will be re-weighted later (i.e. they’re lower down on the dropdown).
Continue to do this as you go down the list of bones, selecting then assigning.
Some notes:
- Like most programs, you can press shift while selecting to extend your existing selection!
- For legs and arms, directions are inverted from what you see. From the front view, the limbs to the visual left side are the right limbs, and the limbs to the visual right side are the left limbs.
- The ‘feel’ bone can be ignored, and the mouth and tail bones can be ignored if they don’t apply to your model.
- The Foot1 bone is the upper leg, foot2 is the lower leg, foot3 is the actual foot.
Once your model is finished, save it as something different than the original edited-[id] file. I named mine chantal1.ms3d, with a number in case I come back to make changes.
5a. Importing to .bcres and final steps
Now that your modified .ms3d is done, copy it and paste it into the folder with CGFX converter.
Open the command prompt, and navigate to the folder with the converter once again.
cd [either manually type the file path or ctrl+v the path you copied earlier]Then, import the model.
CGFXConverter import goa08.bcres chantal1.ms3d goa08-new.bcresAs with last time, change ‘goa08’ to your villager’s id, and ‘chantal1’ to what you saved your modified milkshape model as.
You must include the -new on the edited .bcres, this is a failsafe to avoid accidental overwriting.
Quickly, let’s open Ohana to check things out! This is optional but can give some insight to if something may have messed up.
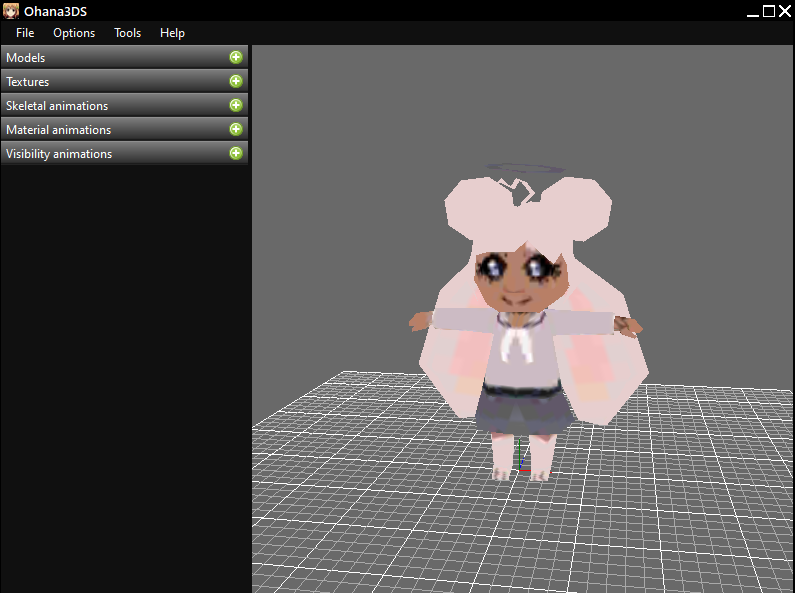
She’s so crunchy!
Now, let’s import her into the game, using Luma’s layeredFS!
Insert your SD card into your computer, and go to the Luma folder. If it doesn’t already exist, make a titles folder, and a folder for your game (for NA Welcome Amiibo, this will be called 0004000000198E00).
Then if it doesn’t exist already, create the following filepath within the game folder;
Romfs -> Npc -> Normal -> Model
Place your modified .bcres file in the Model folder!
Take your SD card out of your computer, and put it back in your 3DS.
Time for the moment of truth! Boot up whichever version of ACNL you have.
A surefire way to tell if everything worked is if your custom villager is the title screen camera focus. If not, the easiest way to test is by going to the Amiibo Camera and calling them in.
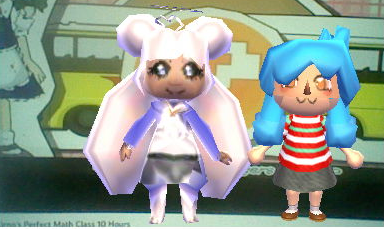
Hooray! Chantal is in the game 😀 As you can kind of see, I need to adjust the rig on her left arm a bit, but she’s real, baby!
CTR studio method
3b. Exporting the base villager and opening in Blender
Open the base villager’s .bcres file in CTR studio, then expand the hierarchy until you see this, marked with a box icon.
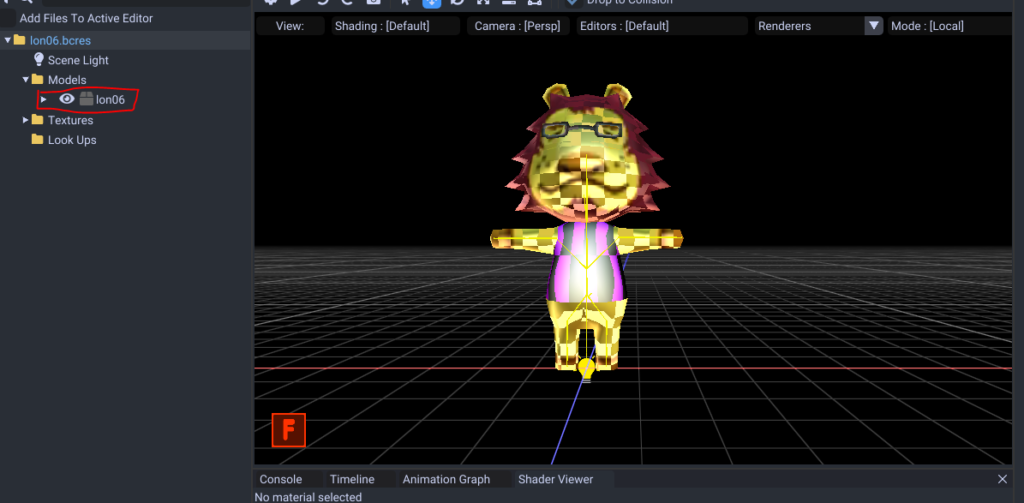
Right-click it, and export it as a .dae. This will also export the original textures in the same filepath!
Next, open up Blender 3.3. Obliterate the cube, and then go to file -> import -> .dae. The only special import option you need to select is ‘fix leaf bones’.
The model is going to be very large when imported, so press numpad . to view the full model.
4b. Merging in your model
If your model is a .blend file from the same version, open up another window of blender and simply copy and paste!
If your model is a .blend file from an older version, go to file -> append -> object and append your model’s parts (you can hold ctrl to select multiple!)
If your model is a .dae or otherwise external format, you can import as normal.
I will not go over rigging in this tutorial, because unlike milkshape, tutorials for rigging are much more widespread for blender (in addition to rigging in blender being less simplified).
All you need to know is you need to appropriately rig your model to the armature that was imported with the base model’s .dae.
YOU MUST USE THE ‘LIMIT TOTAL’ FUNCTION TO LIMIT EACH VERT TO 1 BONE OR YOUR MODEL WILL TURN INTO SPAGHETTI!
Go to the base model’s properties, and open up the UV map tab.
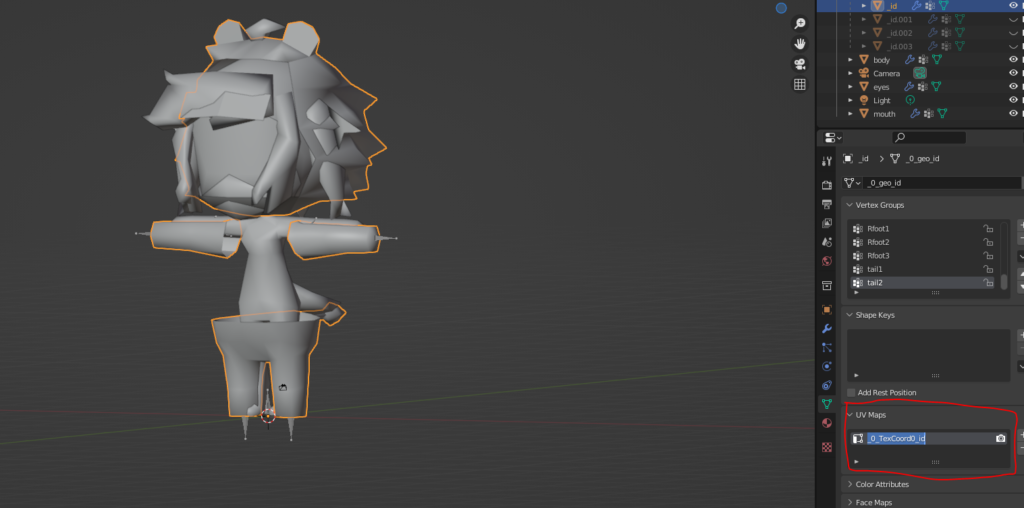
Copy this name, and rename your model’s respective part’s uv map to match. While you’re at it, make sure you replace your model’s materials with the ones used by the base model (b0, m, e, cloth) for each respective part.
Once all these are replaced, you can start merging!
Select a part of the base model and go into edit mode. Select all the verts, then hit the x key to delete them.
Go back to object mode, select your mesh’s respective part, then ctrl+click the mesh you just deleted, and hit ctrl+j. They should be merged now!
If you’d like to remove the shirt completely, go to edit mode and delete all but 1 of the shirt’s faces – then hide the remaining face inside your model.
Export your merged model as a .dae, preferably under a new name.
5b. Importing to bcres
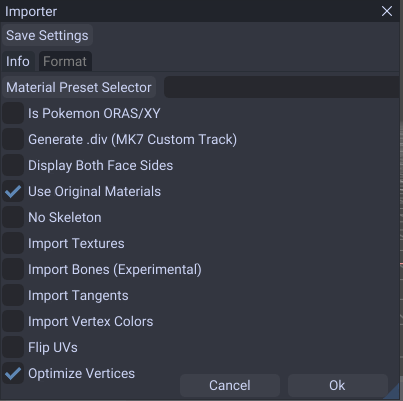
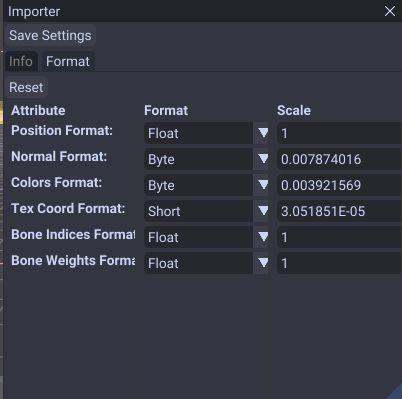
Back in CTR studio, right-click the model and choose to replace it.
Copy these settings on import exactly! You will get crashing/weirdness if you do not.
Next, import your textures – you can do this either in bulk or 1 at a time. There are no special settings needed for this.
If done correctly, your model should look something like this! Don’t mind the grid, that’s the specular map not loading because it’s an external file.
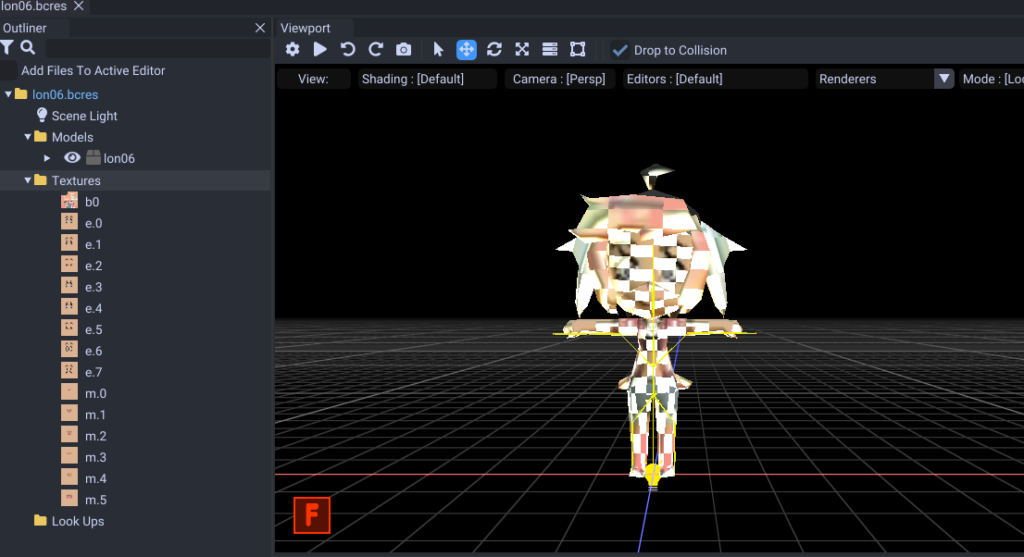
Save as a new .bcres, do not overwrite the original.
Now, let’s import her into the game, using Luma’s layeredFS!
Insert your SD card into your computer, and go to the Luma folder. If it doesn’t already exist, make a titles folder, and a folder for your game (for NA Welcome Amiibo, this will be called 0004000000198E00).
Then if it doesn’t exist already, create the following filepath within the game folder;
Romfs -> Npc -> Normal -> Model
Place your modified .bcres file in the Model folder!
Take your SD card out of your computer, and put it back in your 3DS.
Time for the moment of truth! Boot up whichever version of ACNL you have.
A surefire way to tell if everything worked is if your custom villager is the title screen camera focus. If not, the easiest way to test is by going to the Amiibo Camera and calling them in.
Success! I have to reproportion her a bit later, but she’s ready to scam the town!
7. Bonus touches & ending notes
Rimlight:
If your models are looking too shiny for your liking, it’s probably the rimlight. I made a mod that gets rid of it, you can find it here!
Renaming villagers:
(This is copied from the villager recolor tutorial)
Go to Script > Str > STR_NNpc_name.UMBST and open it on your hex editor. Scroll down until you find the villager names (in your language) and find the one who you’ll be replacing in your game.
Replace each letter with the letter of your new villager’s name.
As you can see, Julian has 6 letters in his name, while Cupid only has 5 so we get rid of that last letter by clicking on it, finding the highlighted values to the left and replacing them with “00″.
DO NOT name your new villagers longer than your old villagers as this might mess up the game. To be safe, choose names with shorter or exact number of letters only.
Thanks for bearing with me, and goodluck!
My most reliable contact if you need help is kk-dirge on tumblr, because Twitter’s dms suck and I’m too much of a hermit to be active anywhere else.
Or try asteriddle on gamebanana. Which I may try using. Who knows.